What is Proxmox and the advantage of Virtual Machines
Proxmox is a debian-based, open-source virtualization environment which allows you to create virtual machines using QEMU/KVM. It has a user-friendly GUI interface and interacting with it through terminal is a breeze as the backend is just the very familiar Debian.
If you have a small team working on a single GPU server, (like the RendeRex 8x GPU Server, the RAPTOR-8), it makes sense to be able to split the GPU’s into several VM’s, allowing each team to seamlessly take advantage of however many GPU’s they’d like, and move them between VM’s without much effort.
Here, we’ll go over the very basics to get started.
Pre-requisites
The first thing you’ll want to do is make sure that virtualization is enabled on your hardware. This is a setting which can be found in the BIOS. For Intel, you’ll want to enable VT-d. For AMD, look for IOMMU. Most modern CPU’s support virtualization and its simply a matter of enabling it. If you bought a pre-configured server from RendeRex, this feature is already enabled for you.
We’ll be taking advantage of PCIe pass-through, allowing us to completely pass-through a PCIe device (in this case, a GPU) from the host (Proxmox), to the guest (an Ubuntu virtual machine).
This will allow us to essentially transform our GPU-server into fully functional, dynamic, independent workstations which can be used by members of the AI team.
Installing Proxmox
The first thing you’ll want to do is grab the latest version of Proxmox from here.
Once its installed, you can access the Web GUI at: https://[proxmox-server-ip]:8006
Configuring Proxmox & setting up IOMMU
1. Grub
Go ahead and SSH into your server, let’s start by making some changes to grub:
(assuming you’re logged in as root:)
1
nano /etc/default/grub
Replace this line
1
GRUB_CMDLINE_LINUX_DEFAULT="quiet"
with:
1
GRUB_CMDLINE_LINUX_DEFAULT="quiet intel_iommu=on"
or, for AMD CPU’s
1
GRUB_CMDLINE_LINUX_DEFAULT="quiet amd_iommu=on"
Next, update grub to apply the changes using:
1
update-grub
2. VFIO modules
To load the VFIO modules needed for PCIe passthrough:
1
nano /etc/modules
and add:
1
2
3
4
vfio
vfio_iommu_type1
vfio_pci
vfio_virqfd
Save and exit out of nano. Next, you’ll need to run the two following commands:
1
2
3
echo "options vfio_iommu_type1 allow_unsafe_interrupts=1" > /etc/modprobe.d/iommu_unsafe_interrupts.conf

echo "options kvm ignore_msrs=1" > /etc/modprobe.d/kvm.conf
3. Block host (Proxmox) from loading drivers
We’ll need to make sure that the host (in this case Proxmox) cannot load the GPU drivers. We can achieve this easily through:
1
nano /etc/modprobe.d/pve-blacklist.conf
and insert:
1
2
3
4
blacklist nvidiafb
blacklist nvidia
blacklist radeon
blacklist nouveau
Save and exit nano, then reboot.
3. Optional (check if IOMMU groupings are correct)
You can check if the IOMMU groupings are correct by running the following script:
1
2
3
4
5
6
#!/bin/bash
for d in /sys/kernel/iommu_groups/*/devices/*; do
  n=${d#*/iommu_groups/*}; n=${n%%/*}
  printf 'IOMMU Group %s ' "$n"
  lspci -nns "${d##*/}"
done
If done correctly, the output should look something like this:
1
2
3
4
5
6
7
8
9
10
11
...
IOMMU Group 51:
        1d:00.0 VGA compatible controller [0300]: NVIDIA Corporation GA102 [GeForce RTX 3090] [10de:2204] (rev a1)
        1d:00.1 Audio device [0403]: NVIDIA Corporation GA102 High Definition Audio Controller [10de:1aef] (rev a1)
IOMMU Group 52:
        1e:00.0 VGA compatible controller [0300]: NVIDIA Corporation GA102 [GeForce RTX 3090] [10de:2204] (rev a1)
        1e:00.1 Audio device [0403]: NVIDIA Corporation GA102 High Definition Audio Controller [10de:1aef] (rev a1)
IOMMU Group 53:
        1f:00.0 VGA compatible controller [0300]: NVIDIA Corporation GA102 [GeForce RTX 3090] [10de:2204] (rev a1)
        1f:00.1 Audio device [0403]: NVIDIA Corporation GA102 High Definition Audio Controller [10de:1aef] (rev a1)
...
If you can see that each GPU has its own IOMMU grouping, then everything went right.
4. Setting up the VM
Once the server has rebooted, access the web GUI (port 8006).
We won’t go over how to set-up an Ubuntu VM here, but you can check out our guide on how to set up a ‘cloud image’ version of Ubuntu.
Attaching the GPU:
Once you have your Ubuntu VM set-up, let’s go ahead and attach the GPU. Under ‘PCIe devices’, scroll down until you find the IOMMU grouping/vendor ID of the GPU you’d like to attach and select it.
CPU:
Make sure that you set the CPU to ‘host’ in order to enable the AVX-512 instruction-set (required for TensorFlow).
Optional
If you’d like to ‘pin’ CPU cores, i.e., reserve specific cores for a virtual machine for increased performance of that CPU, this can be achieved with:
1
taskset --cpu-list --all-tasks --pid [cores] $(< /run/qemu-server/[pid-of-VM.pid])
For example, pinning the first 16 cores of the CPU to a VM with ID 101 would look like this:
1
taskset --cpu-list --all-tasks --pid 0-15 $(< /run/qemu-server/101.pid)
Note that CPU core ID’s begin from 0 instead of 1.
Networking:
In order to take full advantage of networking capabilities, make sure that VirtIO is selected for the network device.
Hardware Summary:
Your hardware should look something like this: 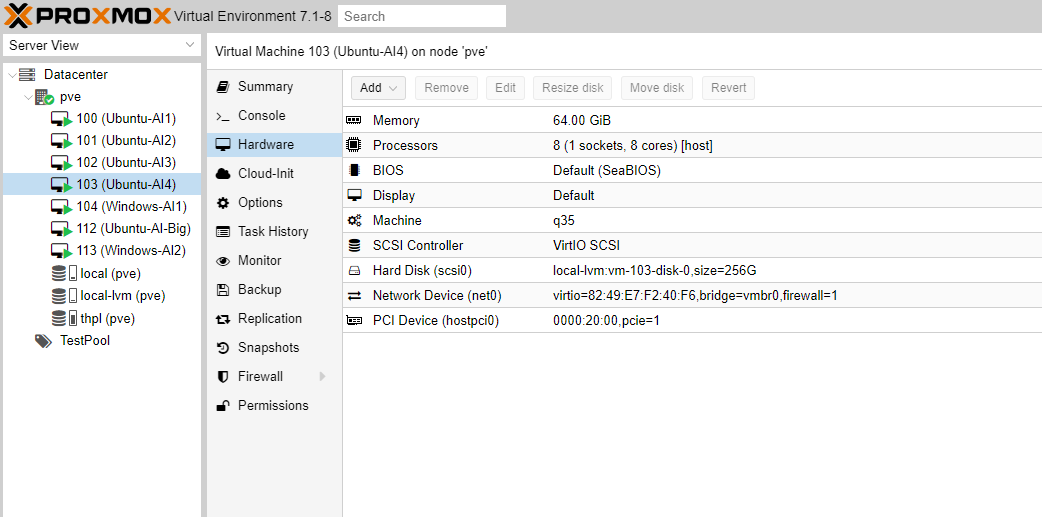
That’s it! Go ahead and start your Ubuntu VM, install the NVidia drivers, and proceed to set it up like you would a workstation.

That wraps up this tutorial. Stay tuned for further optimizations of Proxmox, VM’s for AI, storage for VM’s, Cloud-init Ubuntu Templates, and more!
For pre-built, pre-configured GPU servers for AI, be sure to visit: